Pages

Wednesday, January 5, 2011

Galette of Zucchini and Tomato


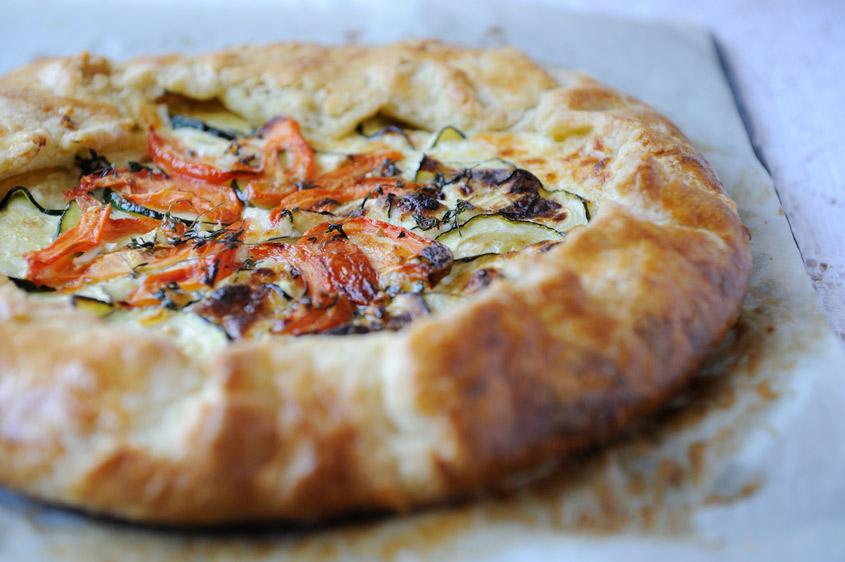
This galette is an adaptation of several others, and includes what I happen to have on hand at the time.  It is simple and satisfying, and is just the kind of food that I love.  Substitutions can be made, of course, for the filling - I have considered roasted red peppers, summer squash, varying tomato hybrids, and eggplant.  One thing to consider always when making a filled pastry such as this, is to keep in mind the amount of liquid that is included, and to always limit the amount of time that transpires between the time you fill it and the time you pop it into the oven.  It begins with a basic pâte brisée (omitting the sugar).  For your reference:

Pâte Brisée
     2 cups flour, sifted
     1.5 sticks (6 ounces) unsalted butter
     1/4 tsp salt
     approx 1/3 cup very cold water

I use a food processor for this - put the first 3 ingredients into the bowl of the processor, and give it a few quick pulses.  You want varying sizes of butter pieces, the largest being about the size of a pea.  You won't get any extra points for beating this to death - manipulate this as little as possible.  Slowly drizzle the cold water into the processor top as you pulse - again don't go crazy with this.  The amount of water to add varies, so continue so long as you see dryness in the dough.  Stop just before you think you are done - you can't remove the water once it's added.  Turn it out onto a sheet of plastic wrap, and ball it up.  Make it into a disc and place into the fridge to rest.

Get your oven preheated to 400º (I recommend a conversion of 375º convection).

Slice a small zucchini into thin coins.  Place them onto a board covered with paper towels, and sprinkle a bit of salt over them.  Leave them there - they need to sweat out some liquid.  Slice a tomato very thin

Shred about a 1/2 cup of mozzarella (not fresh), and mix this with about 1/4 cup of parmesan (preferably parmigiano reggiano), and about 1/2 cup of ricotta.  Finely dice a clove of garlic, and mix it into a bit of olive oil in a small bowl.  Mix about half of this oil/garlic mixture into the cheese.  In another small ramekin, whisk an egg yolk with a bit of cold water.

Retrieve your pâte brisée from the fridge, and turn it out onto a board or counter dusted with semolina or AP flour.  Roll it into about a 15 inch circle.  Place the rolled out pastry onto a sheet pan covered with a piece of parchment.  Place the cheese filling in the middle, leaving about 1.5" around the outside.  After pressing the tomato and zucchini slices with a paper towel on the top to remove all excess liquid, layer the coins of zucchini and tomato like shingles around the middle of the shell.  Sprinkle thyme tips and leaves, or a chiffonade of basil onto the top, and drizzle the remaining oil/garlic over it all.  Fold the pastry edges into the middle, overlapping roughly and pinching when necessary to seal it all in.  It's not a beauty contest - if your pastry is done right it will puff and seal while it is baking.  Use your fingers to rub the yolk/water mixture all over the outside of the pastry, and give it small pinch of salt (fleur de sel is good for this), but don't go overboard.  Pop it into your well preheated oven and bake for approximately 35 minutes, or until the pastry is golden and the filling bubbles.  Serve hot, warm, or at room temperature with a bottle of good red wine.  Serves 2 greedy people, or 4 as a side to a nice roasted chicken or duck.


Tuesday, January 4, 2011

Pudim de Leite

When I was young, my family and I lived in Brasil on a small island called São Luis.  Although I was young at the time, the experience still holds some specific dishes and food experiences dear to my heart. One of the desserts that I routinely make because it is easy, predictable, delicious, and uses very few pantry items that I rarely do not have on hand, is called Pudim de Leite (or Pudim de Leite Condensado).  I find that making smaller ramekins of this pudding instead of a larger dish makes for a more tender and smooth outcome.  I rarely measure the spice additions, and vary them according to what I feel like at the time (usually I fill the tip of a paring knife - that usually does the trick).

Ingredients:
     1 can sweetened condensed milk
     1 can's worth of milk (not skim)
     2 eggs
     sugar
     spice additions to taste (fresh nutmeg, cinnamon)
     a little bit of good quality vanilla extract, or 1 vanilla bean pod's contents

Method:
     Preheat your oven to around 350.  Get a teapot of water going - you will need the boiling water soon.  Place about 1.5 cups of sugar into a sauce pan, and add a little bit of water just to get it moving.  Place the sauce pan on medium high heat, and swirl it a bit.  Don't use a spoon, or the sugar will crystallize onto it and make lumps.  Heat the sugar until it has reduced and is a deep golden color.  I don't use a thermometer for this, but if you choose to the temp you are looking for is around 240 or so.  While your caramel is being made, put the contents of the can of sweetened condensed milk into a blender along with the equal can's worth of milk, the eggs, spices, and vanilla.  Give a a few good whirls until it is well blended.  Meanwhile, place 6 or so small ramekins into the bottom of a deep baking dish (I use a metal pan).  When the sugar in the sauce pan looks right, remove from the heat and pour a small amount into the bottom of each ramekin, 1 at a time.  Quickly swirl the caramelized sugar around in each ramekin, coating the edges about halfway up.  Do this one a time, or the sugar will harden in the cold ramekins too quickly and you won't be able to swirl it.  

Ramekins with caramel.  Photo Jason Snyder

     After having done so for each ramekin, pour your custard mixture into each one, filling to just below the top.  Fill the bottom of the pan with boiling water (in Brasil this is called a Banho Maria).  This ensures that your custards cook evenly and without drying.  

Banho Maria.  Photo Jason Snyder

     Carefully place the whole deal into the preheated oven, and bake for about 40 minutes or so.  Keep an eye on them, though, and check them after about 1/2 hour.  They will not be totally solid when done, and will appear golden brown on the top.

Finished Pudim de Leite.  Photo Jason Snyder

     Serve in the dish, or carefully run a knife along the edge and invert onto a plate.  Inverting it allows for the beautiful caramel to drizzle itself onto to top, and makes for an nice presentation.

Photo Jason Snyder

Photo Jason Snyder


Saturday, January 1, 2011

Notion Restaurant

I have recently had the fortunate experience to be able to photograph Oakmont, PA's newest restaurant - Notion.  Chef Dave Racicot's personal venture opened on New Year's Eve with a full booking of tables, and an ambitious menu including Lamb Smoked in Hay, Beets with Crispy Yogurt, Oro Blanco, Black Currant and Red Onion Marmalade, and a Tuna Tartare with Soy Foam.  Look for some of this to show up on the website (www.notionrestaurant.com), and for periodic updates here as I continue to shoot the food and happenings there.


Chef Racicot is a James Beard Award finalist, and earned Lautrec at Nemcaolin Woodlands the coveted AAA five diamond rating in 2007.


Tuesday, December 21, 2010

Pizza

Dinner last night:

A cracker-thin crust with just the right amount of salt, house made tomato sauce, fresh mozzarella, topped with baby arugula, parmesan reggiano, and a drizzle of olive oil.  Wine was a 2008 Plungerhead Zinfandel, whose slight dryness and crisp finish complimented the pizza well.  This photo was the only one I took before I devoured the entire thing (minus a small slice that my son ate).

Thursday, December 16, 2010

Spoon Restaurant || Pittsburgh, PA

Located in the heart of the newly energized East Liberty section of Pittsburgh, Chef Brian Pekarcik offers an ambitious menu filled with a medley of local farm-to-table ingredients at Spoon.  I happen to know Brian from a long time ago, and discovered him here when Spoon first opened in the summer of 2010.  The atmosphere is elegant, but with a rustic feel that appeals to me.  The plates are simple, sophisticated, and always contain a pleasant surprise or two.

I've done quite a bit of work on photographing the food at Spoon, but it is a foray into a realm of photography that I have yet to really do very often.  I learned very quickly that there is little room for error, and that somehow conveying the flavors, smells, and temperatures that are coming from the plate/bowl/glass in a photograph are very difficult indeed.  It's way easier to make food look unappetizing than it is to make it look palatable (which by the way isn't really good enough - it really should make your mouth water).  I spend a lot of time looking at recipe books, magazines, and food photos in general, and I know what appeals to me as a consumer.  This, of course, is overlaid by what I know as a photographer, and I can't help but reverse engineer the photographs that I see and like.  That being said, I've also learned that in order to achieve anything that is satisfactory to me as an artist (let alone to make the client happy), I really need to forget about what I am 'supposed' to be doing, and begin with what I know.  Good light is the only key to making a good photograph, and food is a shining example of this.

So this is an introduction, a learning experience, and a humbling introduction to what I hope will become an increasingly more frequent occurrence for me.  That being said, here are a few of my favorites from the most recent shoot.  This was all shot with window light, after having done some work these same dishes in studio light (and really not losing any sleep over how good I felt about them).  I picked up a slab marble, some mat board, a recycled pice of a slate roof, and some handmade papers for color.  The location was a floor to ceiling landing where the restaurant opens to their rooftop dining area (which of course is closed curing these very cold winter months).